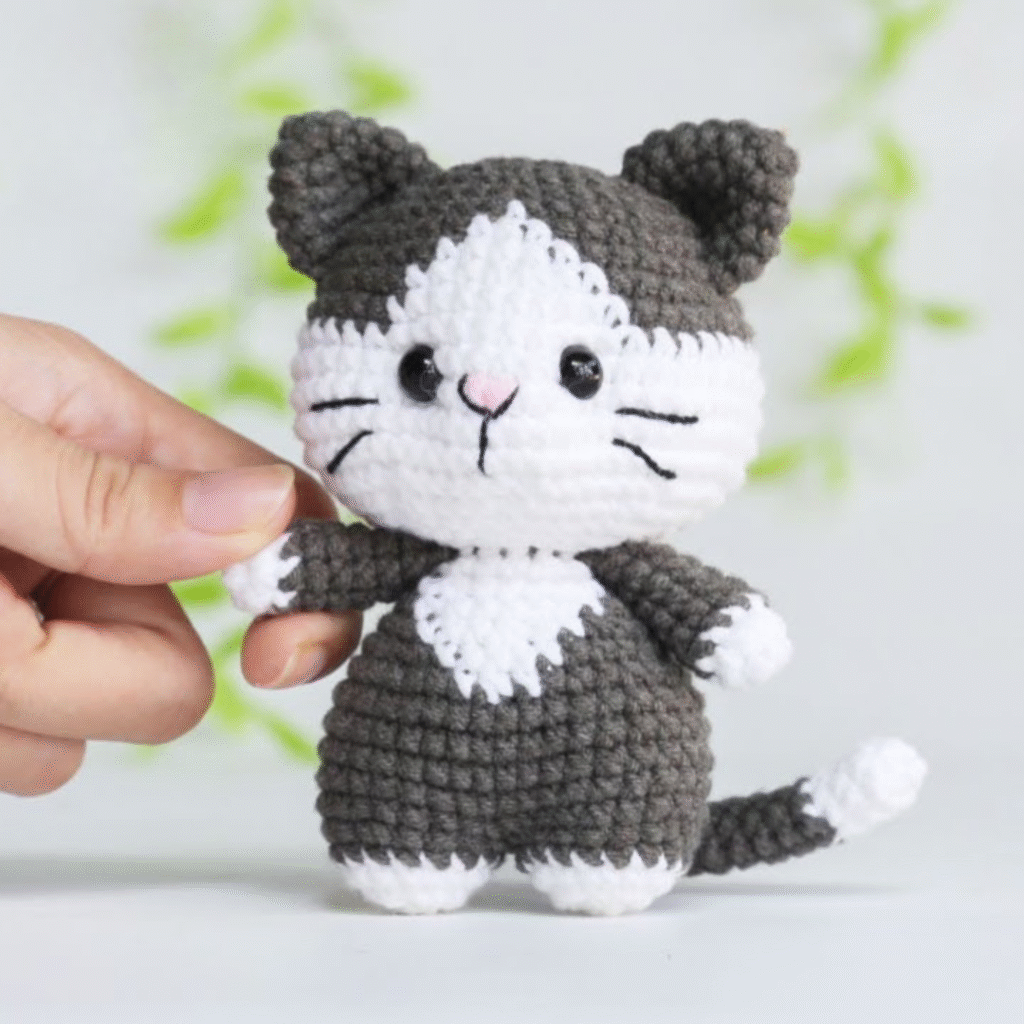
Crochet Animals Amigurumi. If you’re searching for a fun and easy way to get started with amigurumi, this Crochet Cat Pattern is the perfect choice! With its simple shapes, clear color changes, and cute expression, this handmade plushie is a joy to stitch up and an instant favorite for kids and cat lovers alike.
Creating Crochet Animals Amigurumi like this little kitten is one of those experiences that truly captures the heart of handmade work. Even after years of crocheting, pieces like this still bring me that quiet excitement when I see a character slowly come to life in my hands. There’s something so special about transforming simple yarn into a tiny, expressive animal, especially when the design is as charming and balanced as this one. From the soft shaping of the body to the delicate facial details, every step feels intentional and deeply satisfying.
I usually begin with the head, because with animal amigurumi, the face is everything. It sets the tone for the entire piece. Working in continuous rounds, I focus on keeping my tension even and slightly tight, using a smaller hook than usual to achieve that dense, clean fabric that defines high-quality amigurumi. As I build the shape, I pay close attention to the symmetry, especially since this kitten has that beautiful contrast between the white and gray sections. Color changes need to be neat and well-placed, so I take my time transitioning between yarns to keep the lines crisp and smooth.
Crochet Animals Amigurumi Tutorial – Step-by-Step Cat Pattern
This Crochet Animals Amigurumi tutorial walks you through the process of making a charming two-tone kitty with a sweet face and floppy tail. Ideal for intermediate beginners, this project uses basic stitches and colorwork to bring your cat to life. Use your favorite yarn colors to personalize your creation!
Your crochet cat amigurumi is now complete! Whether it’s a thoughtful handmade gift, a desk buddy, or the first in your growing collection of crochet animals, this kitty is sure to steal hearts. Try making more in different colors or adding little accessories for extra charm!
Crochet Animals Amigurumi. Crochet Cat Amigurumi Pattern
Crochet Animals Amigurumi. The yarn choice here plays a big role in the final result. I personally love using cotton or a cotton blend for projects like this because it gives excellent stitch definition, which really highlights the structure of the piece. The gray and white combination is classic and timeless, and it allows the facial features to stand out without overwhelming the design. It’s simple, but that simplicity is what makes it so elegant and visually appealing.
Once the head is shaped, I move on to the body, which is usually worked separately but in a similar style. The proportions here are very important. This kitten has that slightly rounded, compact body that gives it a soft and cuddly appearance. As I crochet, I make sure the increases and decreases are smooth, creating a gentle curve rather than anything too angular. Stuffing is something I always do gradually, shaping as I go to ensure the body feels firm enough to hold its structure but still soft to the touch.
The ears are one of my favorite details on this piece. They’re small, slightly rounded, and positioned in a way that adds so much personality. I always crochet them separately and then pin them in place before attaching. This step is essential because even a slight shift in placement can change the expression of the entire face. Once I’m happy with how they look, I sew them on carefully, making sure they sit naturally and securely.
The arms, legs, and tail are simple but incredibly important for balance and character. I keep them proportional and make sure they’re evenly stuffed and shaped. When attaching them, I always take a moment to step back and look at the piece from different angles. This helps me ensure everything is aligned and that the kitten has a natural, relaxed posture. It’s a small habit, but it makes a big difference in the final result.
The face is where everything truly comes together. For this kitten, the embroidered details are what give it that sweet, gentle expression. The eyes are small and glossy, placed just right to create that soft, innocent look. The little pink nose and stitched whiskers add so much charm without making the design feel overly complicated. I always take my time with embroidery, using fine thread and working slowly to keep the lines clean and precise. This is one of those steps where patience really shows in the finished piece.
Materials:
- 2.5 mm crochet hook
- Cotton or acrylic yarn in dark gray and white
- Pink embroidery thread for nose
- Black embroidery thread or safety eyes (6 mm)
- Polyester stuffing
- Yarn needle
- Stitch marker
Abbreviations (US terms):
- MR: Magic Ring
- SC: Single Crochet
- INC: Increase
- DEC: Decrease
- SL ST: Slip Stitch
- FO: Fasten Off
Head (Start with white yarn):
- MR, 6 SC (6)
- INC in each st (12)
- (SC, INC) x6 (18)
- (2 SC, INC) x6 (24)
- (3 SC, INC) x6 (30)
6–10. SC around (30)
Switch to gray yarn:
11–14. SC around (30)
Insert safety eyes between rounds 7–8. - (3 SC, DEC) x6 (24)
- (2 SC, DEC) x6 (18)
Stuff the head firmly. - (SC, DEC) x6 (12)
- DEC x6 (6), FO and close.
Body (Start with gray):
- MR, 6 SC (6)
- INC in each st (12)
- (SC, INC) x6 (18)
- (2 SC, INC) x6 (24)
5–10. SC around (24)
Switch to white yarn and work 3 rounds (optional colorwork detail). - (2 SC, DEC) x6 (18)
- (SC, DEC) x6 (12)
Stuff well. - DEC x6 (6), FO and close.
Ears (Make 2 in gray):
- MR, 4 SC (4)
- (SC, INC) x2 (6)
- (2 SC, INC) x2 (8)
4–5. SC around (8), FO and sew to head.
Arms (Make 2 – start with white):
- MR, 6 SC (6)
- SC around, switch to gray
3–6. SC around (6), FO and sew to body.
Legs (Make 2 – start with white):
- MR, 6 SC (6)
- (SC, INC) x3 (9), switch to gray
3–5. SC around (9), FO and sew to body.
Tail (Start with gray):
- MR, 6 SC (6)
2–6. SC around, switch to white
7–8. SC around (6), FO and sew to back.
Face Embroidery:
- Sew pink triangle nose.
- Embroider black whiskers and mouth.
In the end, a crochet animal amigurumi like this is more than just a finished object. It’s a reflection of time, patience, and creativity, all woven together stitch by stitch. And honestly, there’s nothing quite like that feeling when you finish, hold it in your hands, and realize you’ve brought something truly adorable to life.