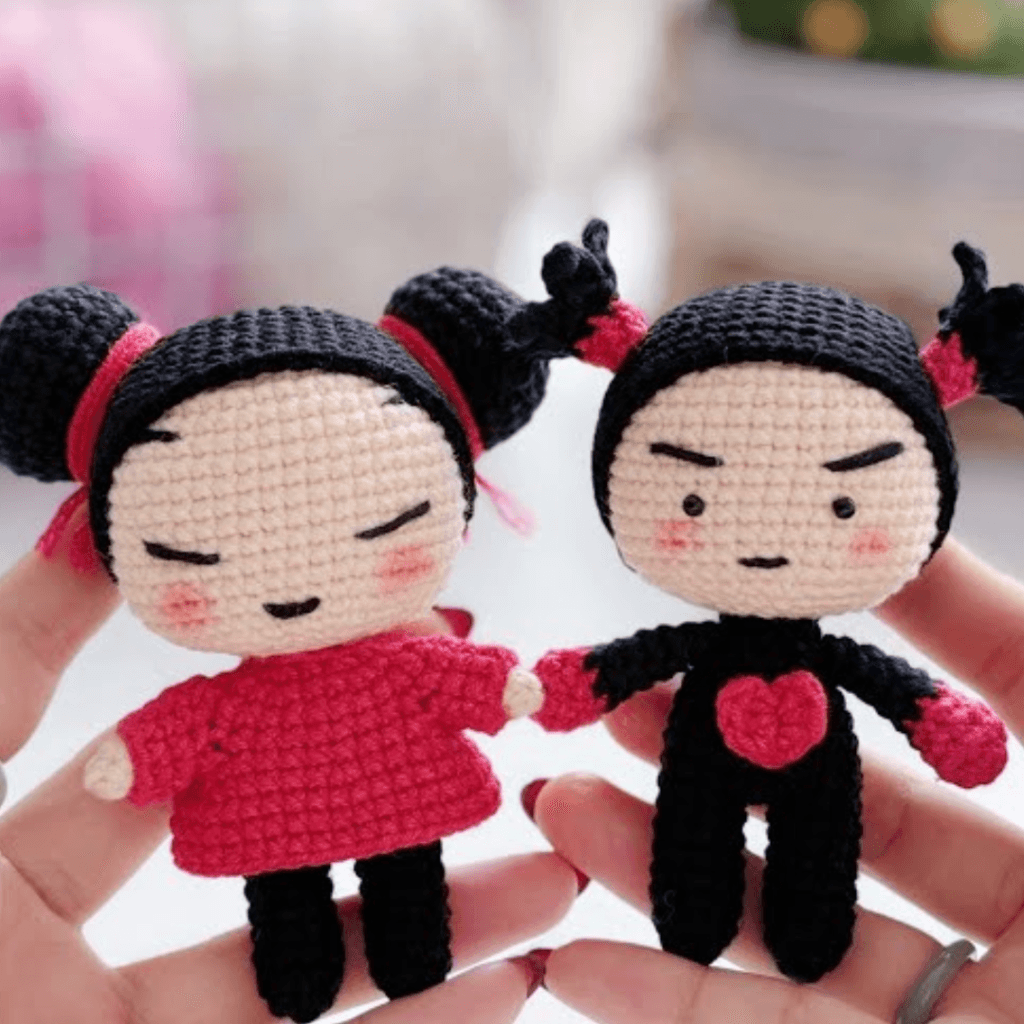
Pucca and Garu-Amigurumi. Bring the iconic duo Pucca and Garu-Amigurumi to life with this adorable crochet pattern! These lovable characters are perfect for fans of the animated series. Whether you’re a beginner or an experienced crocheter, this project is a fun way to create something unique and nostalgic.
Creating Pucca and Garu in amigurumi form is one of those projects that feels full of personality from the very first stitch, especially when you’ve spent years crocheting character dolls and understand how much expression can come from the smallest details. These two are such an iconic pair, and translating their contrasting personalities into yarn is both a challenge and a joy. Pucca, with her playful energy and bold presence, and Garu, with his calm, reserved expression, create a beautiful balance that really comes through in the making.
I usually begin with the heads, because with character amigurumi, the face is always the focal point. Both Pucca and Garu have relatively simple, rounded head shapes, worked in continuous rounds starting with a magic ring. I keep my stitches tight and consistent by using a smaller hook than recommended, which helps maintain a smooth surface and prevents any gaps. For pieces like these, where the features are minimal but very defined, a clean base makes all the difference.
The yarn choices immediately start to separate their identities. For Pucca, I work with a soft peach or light skin tone for the face, paired with deep black for her hair. For Garu, I use a slightly warmer tone for the skin and also black for his hair, but the styling is entirely different. Cotton yarn is usually my preference here because it gives crisp stitch definition and holds the structure well, which is important when you’re working with bold color contrasts.
Step-by-Step Guide to Make Pucca and Garu-Amigurumi
As I build the heads, I stuff them gradually, taking care to keep the shape smooth and evenly rounded. I always pause to adjust the stuffing with my fingers, making sure there are no lumps and that the surface looks clean. This step is especially important because the faces will be quite simple, so any unevenness would be noticeable.
Pucca’s hair is one of her most distinctive features, and I always enjoy creating it. I usually crochet a cap that fits snugly over the head, then add her two signature buns. These are small rounded pieces, attached carefully on either side. Placement is everything here, so I pin them in place first, adjusting until they feel balanced and symmetrical. Once secured, they instantly give Pucca her recognizable silhouette.
Follow this detailed crochet tutorial to make your own Pucca and Garu-Amigurumi set. These characters are ideal for decoration or gifting!
Pucca and Garu-Amigurumi Pattern
Garu’s hair, on the other hand, is simpler but just as important. It’s typically a smooth cap that sits neatly on the head, sometimes with a slight shaping to suggest his more understated style. The simplicity of his design means that clean lines and even stitching are essential.
The bodies are smaller and more straightforward, usually worked separately and attached later. I keep the proportions slightly stylized, with compact bodies that support the larger heads. For Pucca, I often use a bright red for her outfit, keeping it bold and vibrant. For Garu, darker tones like navy or black reflect his more reserved personality. These color choices play a big role in defining each character.
The arms and legs are small and simple, but they still require careful placement. I usually crochet them as narrow tubes, lightly stuffed or left slightly flexible. Attaching them evenly is important for balance, so I take a moment to check their positioning from different angles before sewing them securely.
The faces are where everything truly comes to life, and this is the part I approach with the most care. Pucca’s expression is playful and full of energy, often with slightly curved eyes that suggest her cheerful nature. Garu’s face is much more neutral, with simple, straight features that reflect his calm demeanor. I usually embroider the eyes and other details, as this gives me more control over the expression. Even the smallest adjustment in placement can change the entire look, so I take my time here.
One of the things I’ve learned over the years is that contrast is key when working on character pairs like this. Pucca’s bold shapes and bright colors stand out beautifully against Garu’s more subdued design. When placed side by side, they complement each other perfectly, and that’s something I always keep in mind as I work.
Materials:
- Yarn:
- Red for Pucca’s dress
- Black for hair and Garu’s ninja outfit
- White for Garu’s face
- Beige for Pucca’s face
- Pink for cheeks
- Hook: 3.5 mm crochet hook
- Safety eyes: 8 mm
- Polyfill stuffing
- Yarn needle
- Embroidery thread (black, red)
Abbreviations:
- MR: Magic ring
- sc: Single crochet
- inc: Increase (2 sc in the same stitch)
- dec: Decrease (single crochet two stitches together)
- sl st: Slip stitch
Pattern Instructions:
Pucca’s Head and Body:
- Head (Beige Yarn):
- Round 1: MR, 6 sc into the ring. (6)
- Round 2: Inc in each stitch around. (12)
- Round 3: [1 sc, inc] repeat around. (18)
- Rounds 4-7: Sc in each stitch around. (18)
- Round 8: [1 sc, dec] repeat around. (12)
- Stuff firmly and fasten off.
- Body (Red Yarn):
- Round 1: MR, 6 sc into the ring. (6)
- Round 2: Inc in each stitch around. (12)
- Rounds 3-5: Sc in each stitch around. (12)
- Stuff lightly and fasten off.
Pucca’s Hair Buns (Make 2):
- Round 1: MR, 6 sc into the ring. (6)
- Round 2: Inc in each stitch around. (12)
- Round 3: Sc in each stitch around. (12)
- Fasten off and stuff lightly.
Garu’s Head and Body:
- Head (White Yarn):
- Round 1: MR, 6 sc into the ring. (6)
- Round 2: Inc in each stitch around. (12)
- Round 3: [1 sc, inc] repeat around. (18)
- Rounds 4-7: Sc in each stitch around. (18)
- Round 8: [1 sc, dec] repeat around. (12)
- Stuff firmly and fasten off.
- Body (Black Yarn):
- Round 1: MR, 6 sc into the ring. (6)
- Round 2: Inc in each stitch around. (12)
- Rounds 3-5: Sc in each stitch around. (12)
- Stuff lightly and fasten off.
Assembly for Both Characters:
- Attach Pucca’s hair buns to either side of her head.
- Sew the head to the body for both Pucca and Garu.
- Embroider facial details:
- Add Pucca’s eyes and smile using black thread.
- Add pink blush to Pucca’s cheeks.
- Add Garu’s eyes and ninja mask details with black thread.
Pucca and Garu-Amigurumi. Final Thoughts
Finishing is always done with care. I weave in all ends thoroughly, ensuring nothing is visible. I gently shape each doll with my hands, smoothing the surface and adjusting the stuffing if needed. These final touches bring everything together and give the pieces that refined, handmade quality.
After years of crocheting, I’ve come to appreciate projects like Pucca and Garu for the way they combine simplicity and expression. They don’t rely on complex techniques, but they do require attention, balance, and a good understanding of proportion. It’s a reminder that even minimal designs can carry so much personality when crafted thoughtfully.
In the end, holding these two finished amigurumi pieces in your hands is incredibly satisfying. They’re soft, expressive, and full of character, each one reflecting a different mood and energy. And honestly, there’s something truly special about seeing them together, knowing they were shaped slowly, stitch by stitch, into a pair that feels both playful and complete.
Crocheting Pucca and Garu-Amigurumi is a delightful way to showcase your love for these timeless characters. These amigurumi dolls make fantastic gifts or collectible items. Let your crochet skills bring their playful charm to life!