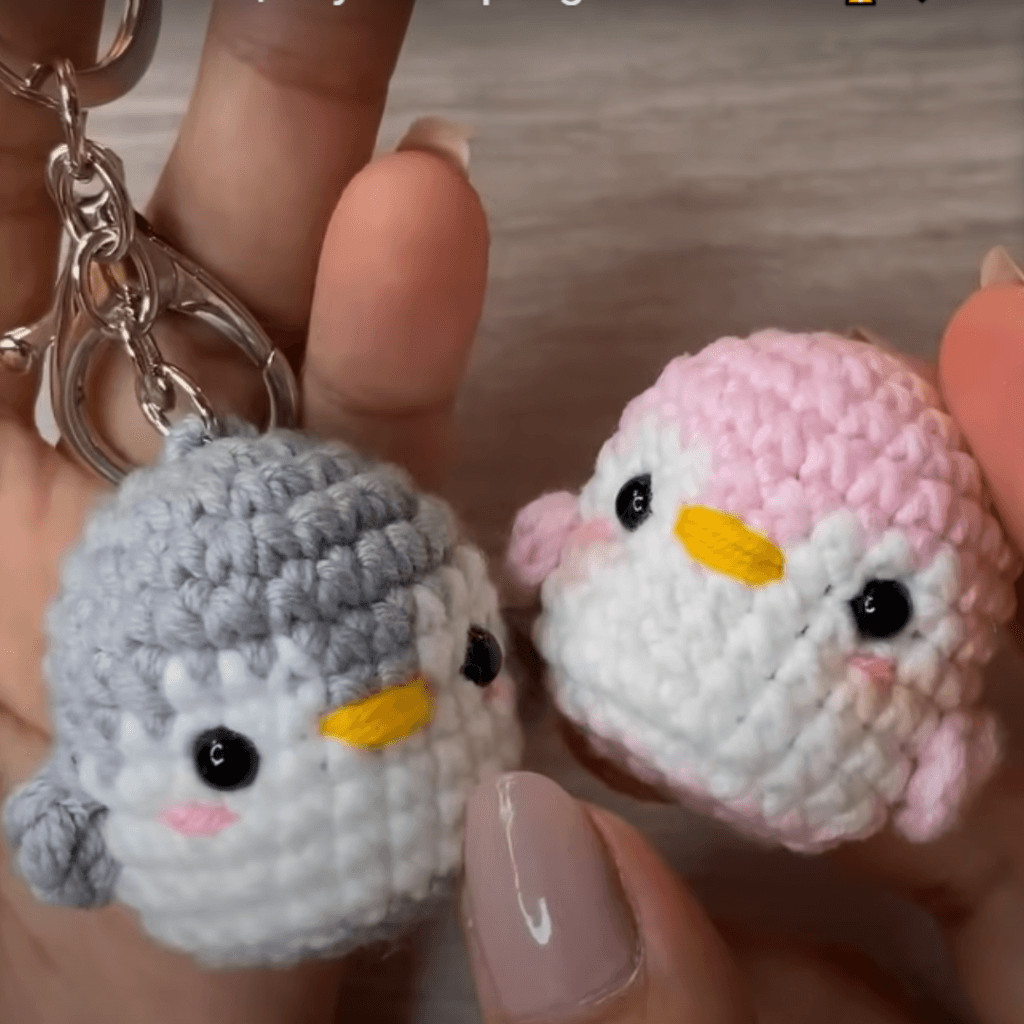
Looking for a cute and functional project? This keychain penguin crochet pattern is the perfect accessory to add charm to your keys or bags!
Creating a Keychain Penguin Crochet Pattern is one of those delightful projects that reminds me why I fell in love with amigurumi in the first place. As an experienced crocheter, I know that some of the smallest projects can bring the greatest sense of accomplishment, and a tiny penguin keychain is a perfect example. It combines adorable proportions with practical functionality, making it an ideal gift, a charming accessory, or simply a fun weekend project. Even though it fits in the palm of your hand, every stitch plays an important role in bringing this little bird to life.
Whenever I begin a crochet penguin, the first thing I consider is my yarn selection. Since this is a miniature project, stitch definition is extremely important. I almost always choose a high-quality cotton yarn because it creates clean, crisp stitches that make every detail stand out beautifully. The classic penguin color palette is simple but iconic. Deep black or charcoal gray forms the back and head, bright white shapes the face and belly, while a cheerful orange or golden yellow brings the beak and feet to life. These contrasting colors instantly make the penguin recognizable, even before all the finishing details are added.
Choosing the correct hook is just as important as selecting the yarn. For amigurumi, especially keychains, I prefer using a hook one or two sizes smaller than the yarn label recommends. This creates a dense fabric that prevents stuffing from showing through while giving the finished penguin a smooth and sturdy structure. Since a keychain will be handled frequently, tight stitches help the piece maintain its shape over time. Through years of crocheting, I have learned that patience and consistent tension produce a far better result than trying to work too quickly.
How to Crochet an Adorable Keychain penguin crochet
Craft your own keychain penguin with this easy-to-follow crochet pattern. These tiny penguins are quick to make and perfect for gifting or personal use!
This keychain penguin crochet pattern is ideal for beginners and experts alike. Enjoy the joy of creating these adorable companions for your everyday accessories!
I usually begin with the body because the penguin’s shape is one of its defining characteristics. Unlike many other amigurumi animals, penguins have a naturally rounded silhouette that makes them especially charming in crochet form. Working in continuous rounds, I carefully shape the body, making gradual increases and decreases to create a soft oval. As I crochet, I add stuffing little by little, gently shaping it with my fingers to ensure the surface remains smooth and evenly filled. This step may seem simple, but it has a huge impact on the finished appearance.
The white belly panel is one of my favorite features because it immediately transforms a simple black shape into a recognizable penguin. Depending on the design, this section may be crocheted directly into the body through color changes or attached separately afterward. Either method works beautifully, but I always pay close attention to symmetry. A well-centered belly gives the entire project a polished and balanced appearance.
Keychain Penguin Crochet Pattern
The head naturally flows from the body in many patterns, creating the signature rounded look that makes amigurumi penguins so adorable. I enjoy watching the little character gradually emerge as the rounds build upon each other. Before closing the final opening, I carefully adjust the stuffing one last time, making sure the head remains perfectly round without becoming overly firm.
The beak is a tiny detail, but it contributes enormously to the penguin’s personality. I usually crochet it separately using bright orange yarn and keep it small enough to maintain the miniature proportions of the project. Attaching the beak requires patience because even moving it by a single stitch can completely change the expression. I often pin it in place before sewing so I can evaluate the face from different angles
The eyes are another detail that deserves careful attention. Small safety eyes create a classic amigurumi appearance, while embroidered eyes produce a softer, more child-friendly finish. I always take my time positioning them because they determine whether the penguin looks playful, curious, sleepy, or cheerful. It’s amazing how tiny adjustments can completely transform the character of the finished piece.
The wings may seem like simple additions, but they help define the penguin’s silhouette. I prefer making them slightly curved so they rest naturally against the sides of the body. Their placement should feel balanced and symmetrical, creating the impression of tiny flippers rather than arms. Once attached, the penguin immediately gains more personality and charm.
Materials:
- Yarn: DK or sport weight yarn in gray, pink, white, and yellow
- Hook: 2.5 mm crochet hook
- Stuffing: Polyester fiberfill
- Safety eyes: 6 mm
- Keychain ring
- Embroidery thread (optional): For blush details
- Yarn needle
- Scissors
Abbreviations:
- MR: Magic ring
- sc: Single crochet
- inc: Increase (2 sc in the same stitch)
- dec: Decrease (sc2tog)
- sl st: Slip stitch
Instructions:
Body (Main Color):
- Round 1: MR, 6 sc into the ring. (6)
- Round 2: Inc in each stitch around. (12)
- Round 3: [1 sc, inc] repeat around. (18)
- Round 4: [2 sc, inc] repeat around. (24)
- Rounds 5-8: Sc in each stitch around. (24)
- Round 9: [2 sc, dec] repeat around. (18)
- Begin stuffing the body firmly.
- Round 10: [1 sc, dec] repeat around. (12)
- Round 11: Dec around. (6)
- Fasten off and close the opening.
Face Patch (White):
- Round 1: MR, 6 sc into the ring. (6)
- Round 2: Inc in each stitch around. (12)
- Fasten off, leaving a long tail for sewing.
- Sew the patch onto the front of the body.
Beak (Yellow):
- Row 1: Chain 4, sc in the second chain from the hook, sc in the next two chains. (3)
- Fasten off and sew the beak to the center of the face patch.
Wings (Make 2):
- Round 1: MR, 6 sc into the ring. (6)
- Round 2: Sc in each stitch around. (6)
- Fasten off and sew one wing on each side of the body.
Blush (Pink – Optional):
- Using embroidery thread, add two small blush dots below the eyes.
Assembly:
- Attach the safety eyes above the beak on the white patch.
- Sew all parts securely to the body.
- Attach the keychain ring to the top of the penguin.
In the end, creating a Keychain Penguin Crochet Pattern is about much more than making a simple accessory. It is about transforming yarn into a charming companion that brings smiles wherever it goes. From the rounded body and tiny wings to the cheerful beak and expressive eyes, every stitch contributes to a finished piece that celebrates both the beauty of handmade craftsmanship and the endless possibilities of amigurumi.