DIY crochet basket idea. Add a touch of elegance and functionality to your home with this beautiful DIYcrochet basket idea. Perfect for storage and decoration! Creating a DIY crochet basket is one of those projects that feels both practical and deeply satisfying, especially when you’ve spent years working with yarn and understand how much structure and intention goes into something that looks so simple.
It’s the kind of piece that blends beauty and function effortlessly, turning basic stitches into something you can actually use every day. Even now, I still find myself drawn to basket projects whenever I want something grounding, something that lets me focus on technique while creating something truly useful.
I usually begin with the base, because that’s where the strength of the basket is built. Starting with a magic ring, I work in continuous rounds, increasing evenly to create a flat circle. This step is all about precision. If the increases are too tight or too loose, the base can curl or ripple, so I pay close attention to my tension and stitch placement. I almost always use a smaller hook than the yarn suggests, especially for baskets, because tighter stitches give the structure the firmness it needs to stand on its own.
How to Make a DIY crochet basket idea
Follow this step-by-step guide to create a stunning DIY crochet basket idea, ideal for organizing your space in style.
The choice of yarn is one of the most important decisions for a project like this. For a sturdy basket, I tend to reach for cotton yarn or even a thicker cord-style yarn. These fibers hold their shape beautifully and give the basket that clean, structured look. Sometimes I’ll hold two strands together for extra thickness, especially if I want a more robust result. The color choice can completely change the feel of the basket, from soft neutrals that blend into a space, to bold tones that make it a statement piece.
Once the base is complete, I transition into building the sides. This is done by working without increases, allowing the stitches to rise naturally. I often work into the back loop only for the first round of the sides, which creates a subtle edge that helps define the base and gives the basket a more polished look. As the sides grow, I focus on keeping them straight and even, maintaining consistent tension so the basket doesn’t lean or warp.
DIY crochet basket idea Pattern
There’s a rhythm to this part of the process that I really enjoy. Stitch after stitch, the basket begins to take shape, and it’s incredibly satisfying to watch it grow taller. I occasionally pause to gently shape it with my hands, making sure the sides are even and the structure feels balanced. With experience, you start to recognize when a piece needs a slight adjustment, and these small corrections make all the difference in the final result.
The height of the basket depends on its intended use, and this is where the “DIY” aspect really shines. A shorter basket works beautifully for holding small items like keys or accessories, while a taller one can be used for yarn storage, plants, or even household essentials. I like to think about how the basket will be used as I crochet, adjusting the height accordingly.
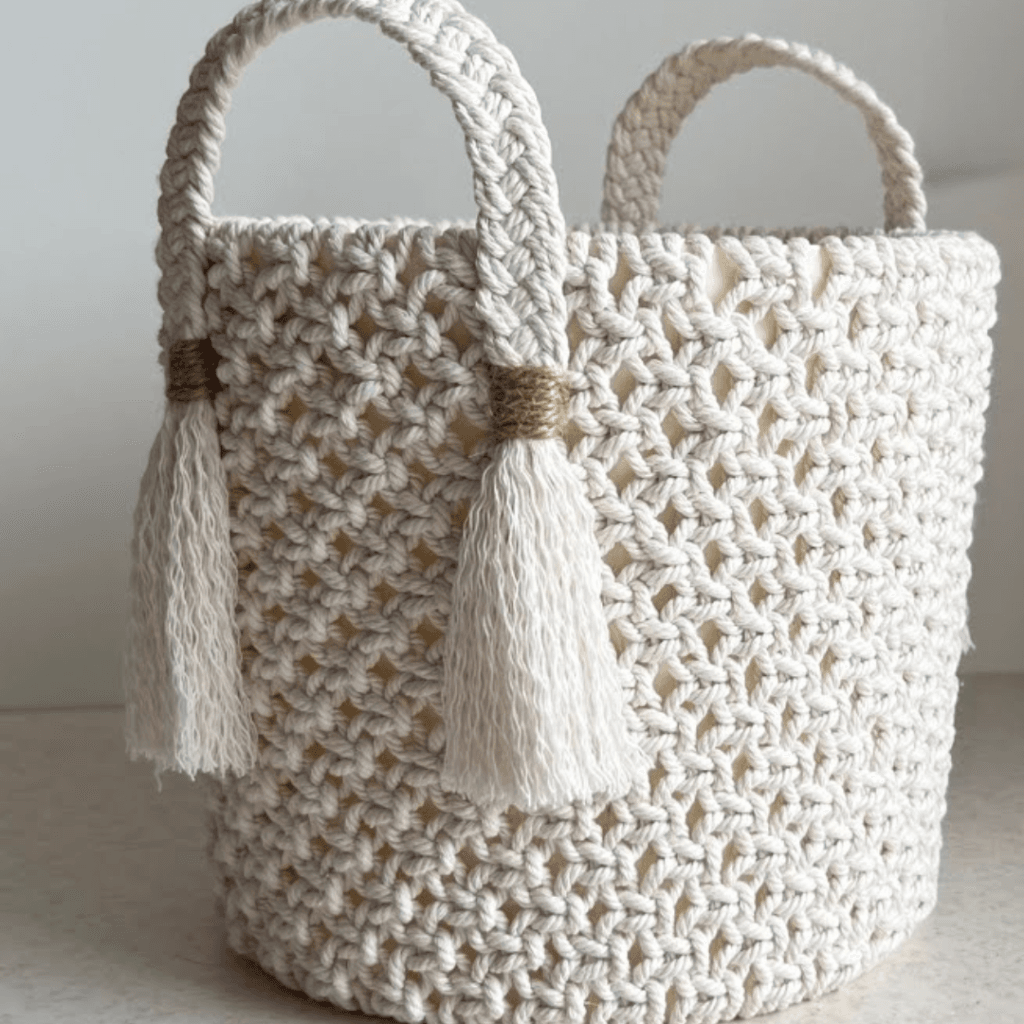
Handles are an optional but very practical addition, and I always enjoy incorporating them when the design calls for it. There are a few ways to create handles, sometimes by chaining and skipping stitches within the round, or by crocheting separate pieces and attaching them later. Either way, I make sure they are strong and secure, reinforcing them with tight stitches so they can handle regular use without stretching.
Texture is another element I like to play with in crochet baskets. While a simple stitch pattern can look clean and modern, adding subtle texture through stitches like half double crochet in the third loop or using front post stitches can give the basket more depth. These details are not necessary, but they add a layer of interest that makes the piece feel more unique.
Materials:
- Yarn: Cotton rope or bulky yarn (cream or preferred color)
- Hook: 5.0 mm crochet hook
- Scissors
- Yarn needle
- Jute twine (optional for detail)
- Tassel maker or cardboard
Abbreviations:
- ch: Chain
- sc: Single crochet
- sl st: Slip stitch
- hdc: Half double crochet
- st: Stitch
Instructions:
Base:
- Round 1: Create a magic ring and work 8 sc into the ring. Sl st to join. (8)
- Round 2: Ch 1, 2 sc in each st around. Sl st to join. (16)
- Round 3: Ch 1, [1 sc, 2 sc in next st] repeat around. Sl st to join. (24)
- Round 4: Ch 1, [2 sc, 2 sc in next st] repeat around. Sl st to join. (32)
- Continue increasing in this pattern until the base reaches your desired size.
Body:
- Round 1: Ch 1, sc in the back loop only in each st around. Sl st to join.
- Round 2: Ch 1, work hdc in each st around. Sl st to join.
- Repeat Round 2 until the basket reaches your desired height.
Handles:
- Locate two opposite sides of the basket.
- Skip 4 sts, ch 8 (or desired length for handle), and skip 4 sts again. Attach with a sl st.
- Repeat for the other side.
- Next round, sc in each st and ch space to strengthen the handles.
Tassels:
- Wrap yarn around a tassel maker or cardboard until the tassel is thick enough.
- Tie the top securely and cut the bottom.
- Wrap jute twine around the top for added detail and tie securely.
- Attach the tassels to the handles or sides of the basket.
DIY crochet basket idea. Final Thoughts
Your crochet basket with tassels is complete! DIY crochet basket idea This elegant project is not only functional but also enhances the aesthetic of any room. Customize it with different colors and sizes to suit your needs.
As I near the top, I like to finish with a clean edge. A round of slip stitches or single crochet can create a neat, defined border that ties the whole piece together. It’s a small detail, but it gives the basket a more refined and finished appearance.
Finishing is something I always approach with care. I weave in all ends securely, making sure nothing is visible. I then take a moment to shape the basket with my hands, smoothing out the sides and ensuring it sits flat. If I’m working with cotton yarn, I might lightly steam the basket from a distance to help the fibers settle and enhance the structure.
What I love most about a DIY crochet basket is its versatility. It can be as simple or as detailed as you like, adapted to fit any space or purpose. It’s also a wonderful way to use up yarn from your stash, combining colors and textures to create something truly personal. No two baskets ever turn out exactly the same, and that’s part of the charm.