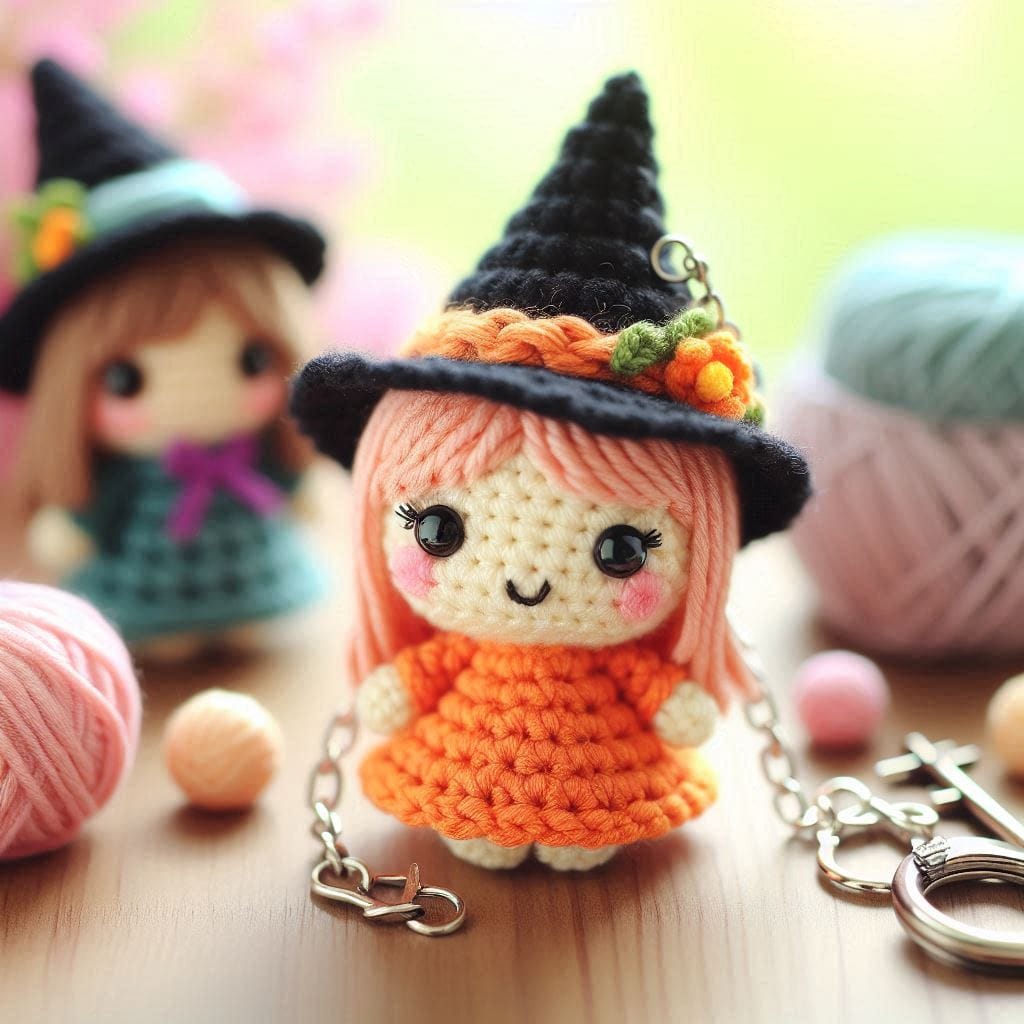
This adorable crochet witch keychain is a delightful accessory that adds a touch of Halloween magic to your everyday items. With her cute little hat and charming dress, this tiny witch is perfect for gifting or keeping as a personal lucky charm during the spooky season.
Oh my yarn! Let me tell you, crafting this Crochet Witch Keychain was an absolute treat—no tricks involved (okay, maybe just a few magical ones)! Whether you’re a beginner in the world of amigurumi or a seasoned crochet witch yourself, this little project will have you falling under its spell in no time.
As someone who loves all things whimsical and spooky-cute, I always get especially excited when autumn starts to creep in and Halloween decor fills the air. That’s when the cauldron of inspiration bubbles over and I start brewing up tiny witchy makes—and this adorable little witch keychain quickly became one of my favorite creations.
Let’s start with her size. She’s pocket-sized perfection—small enough to sit on your keyring, backpack, or even dangle from your rearview mirror. But don’t let her tiny size fool you—she’s got personality for days! With her curly little braids, pointy hat, and sweet stitched face, she’s got just enough charm to melt even the grumpiest ghoul’s heart.
How to Crochet Witch Keychain
Creating this crochet witch keychain involves amigurumi techniques, making it a fun and quick project for both beginners and experienced crocheters. The detailed steps below will guide you in crafting this lovely and festive keychain.
For this project, I used worsted weight yarn and a 2.5mm hook to get those neat, tight stitches that hold their shape. You’ll only need small scraps of each color—black for her hat and shoes, a soft flesh tone for her skin, a fun pop of color for her dress, and maybe a little orange or green for that pumpkin she carries (optional, but ridiculously cute). If you want to go extra magical, you can even add a tiny broom or glittery yarn for her hair!
The pattern is worked mostly in continuous rounds using the magic ring technique, which helps eliminate any holes or gaps—perfect for a neat finish. I like to stuff her body and head with fiberfill as I go, using the back of my hook or a chopstick to really get into those tiny spots. When you start assembling the parts, that’s when she really comes to life. I always find myself smiling as I sew her features in place—it’s like giving a soul to yarn. Pure magic!
Now let’s talk about her hat—the crown jewel of this little keychain. It’s shaped just right, and once it’s perched on her tiny head, it transforms her from “cute little doll” into “full-on crochet enchantress.” You can even add a little stitched buckle or a contrast-colored stripe around the brim to make it pop. I’ve seen crafters get super creative and even add glow-in-the-dark thread to the edges!
Her facial expression is simple but effective—just a pair of safety eyes (or embroidered dots if you prefer) and a tiny smile stitched with black embroidery thread. Some crocheters like to add a tiny blush using fabric paint or even a hint of pink pastel. It gives her such a sweet, friendly expression—you almost expect her to cast a spell of happiness on your whole keyring.
Speaking of the keychain part, I attach mine with a sturdy jump ring and a lobster clasp so I can easily clip it on and off bags or keys. You could also sew a loop of yarn into her hat or back and thread a ring through it—that works just as well and keeps things nice and secure.
Crochet Witch Keychain Crochet Pattern: Witch Keychain
Materials:
- DK weight yarn in skin color, black, orange, green, and yellow
- Crochet hook size D/3 (3.25 mm)
- 6 mm safety eyes
- Tapestry needle
- Polyester stuffing
- Keychain ring and chain
- Stitch markers
- Blush for cheeks (optional)
Abbreviations:
- ch: chain
- sc: single crochet
- inc: increase (2 sc in the next st)
- dec: decrease (sc two stitches together)
- sl st: slip stitch
- rnd: round
- st(s): stitch(es)
- FO: fasten off
Head and Body (Skin Color Yarn):
- Head:
- Rnd 1: Magic ring, 6 sc in the ring (6 sts).
- Rnd 2: Inc in each st around (12 sts).
- Rnd 3: Sc in next st, inc in next st, repeat around (18 sts).
- Rnd 4-7: Sc in each st around (18 sts).
- Insert safety eyes between Rnd 4 and 5, about 5 sts apart.
- Rnd 8: Sc in next st, dec in next st, repeat around (12 sts).
- Rnd 9: Dec in each st around (6 sts).
- Stuff firmly.
- FO and weave in the end.
- Body (Orange Yarn):
- Rnd 1: Attach orange yarn to any st of the head, ch 1, sc in each st around (6 sts).
- Rnd 2: Inc in each st around (12 sts).
- Rnd 3: Sc in next st, inc in next st, repeat around (18 sts).
- Rnd 4-6: Sc in each st around (18 sts).
- Rnd 7: Sc in next st, dec in next st, repeat around (12 sts).
- Rnd 8: Dec in each st around (6 sts).
- Stuff the body lightly.
- FO, leaving a long tail to close and sew to the legs.
Legs (Skin Color Yarn):
- Make 2.
- Rnd 1: Magic ring, 6 sc in the ring (6 sts).
- Rnd 2-4: Sc in each st around (6 sts).
- FO, leaving a long tail for sewing.
- Sew the legs to the bottom of the body.
Arms (Skin Color Yarn):
- Make 2.
- Rnd 1: Magic ring, 5 sc in the ring (5 sts).
- Rnd 2-3: Sc in each st around (5 sts).
- FO, leaving a long tail for sewing.
- Sew the arms to the sides of the body.
Hat (Black Yarn):
- Rnd 1: Magic ring, 6 sc in the ring (6 sts).
- Rnd 2: Sc in next st, inc in next st, repeat around (9 sts).
- Rnd 3: Sc in next 2 sts, inc in next st, repeat around (12 sts).
- Rnd 4: Sc in next 3 sts, inc in next st, repeat around (15 sts).
- Continue increasing 3 sts every round until the hat fits snugly on the head.
- To create the brim, sc in next st, ch 1 around.
- FO and weave in the end.
- Optional: Add a small yellow and green flower on the hat for decoration.
Hair (Orange Yarn):
- Cut strands of yarn and attach them to the head for hair.
- Style the hair as desired.
Assembly:
- Place the hat on the head and sew it securely.
- Attach the keychain ring and chain to the top of the hat.
- Use blush to add rosy cheeks.
Crochet Witch Keychain. Conclusion
This project makes such a thoughtful handmade gift, too. I’ve made several for friends who love Halloween, fantasy books, or even just cute things. One friend hung hers on her Halloween tree (yes, that’s a thing now, and I’m here for it). Another gifted one to her daughter as a “first day of school buddy” for her backpack. It’s a versatile little treasure that brings smiles wherever it goes.
And let’s not forget how beginner-friendly this can be. If you’re new to amigurumi, this is a great entry point: small, low-commitment, and incredibly satisfying to complete. You’ll practice basic stitches like single crochet, increases, decreases, and the magic ring—and by the end of it, you’ll have a tiny masterpiece to be proud of.
In fact, this witch is so fun to make, I ended up creating a whole collection—each with a different colored dress, hairstyle, and accessory. One carries a tiny pumpkin, another a tiny black cat. You could totally customize yours with seasonal colors, themed outfits, or even matching ones for you and a friend!
So if you’re looking for a bewitching little crochet project to dive into—whether it’s spooky season or not—I highly recommend giving this Crochet Witch Keychain a go. It’s fast, fun, and full of charm, just like any good handmade creation should be. And once you’ve made one, don’t be surprised if your hook starts twitching for another. After all, what’s better than one tiny witch to keep you company? A whole coven of course!
Your cute witch keychain is ready to accompany you on all your Halloween adventures!
[/read]