Crocheting a Crochet Witch Doll is a delightful project, especially for those who love adding a touch of handmade charm to their Halloween decorations. This detailed guide will walk you through the entire process, from gathering your materials to the final assembly of your crochet witch doll. Whether you’re a seasoned crocheter or a beginner looking for a fun and festive project, this witch doll is the perfect way to enhance your crochet collection.
Materials and Steps to Crochet Witch Doll
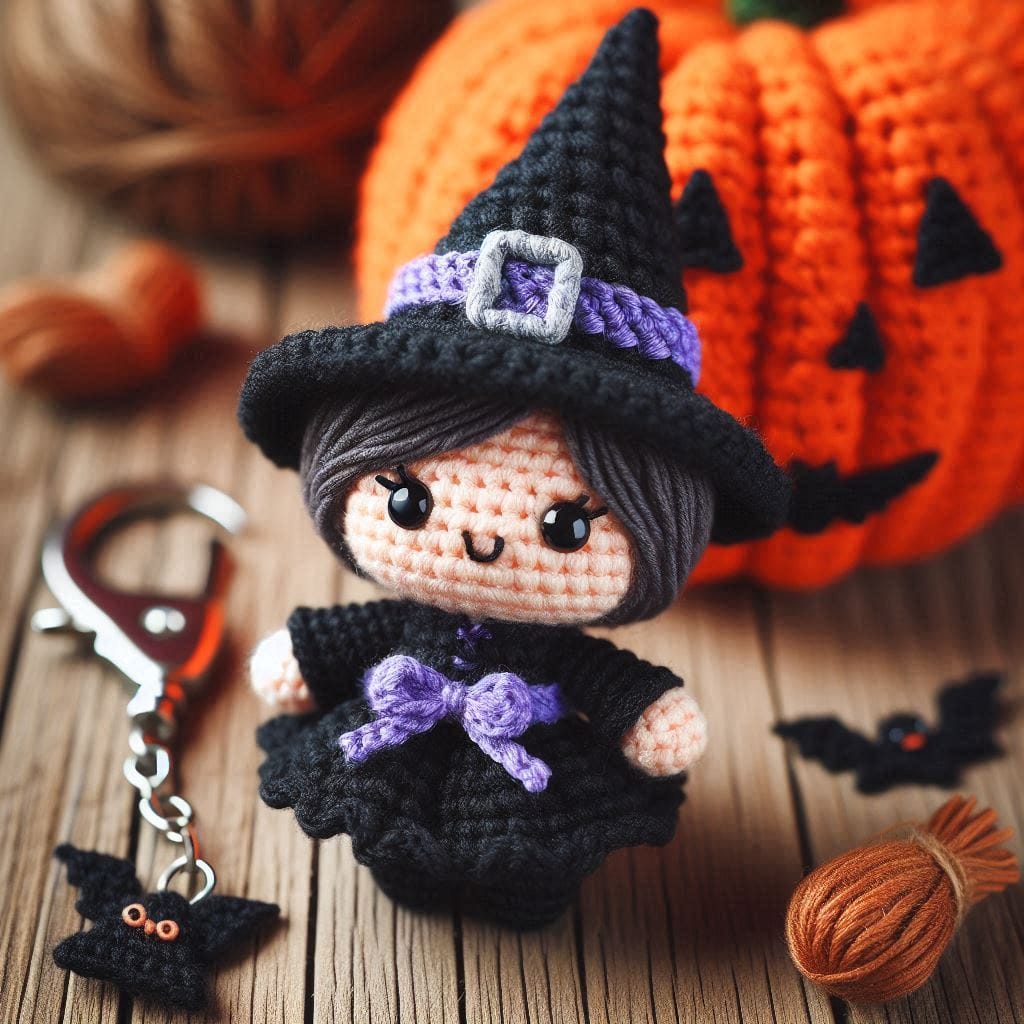
To get started, Crochet Witch Doll you’ll need a selection of worsted weight yarn in various colors, a crochet hook, safety eyes, and other basic crochet supplies. The head and body are crocheted separately and then sewn together, while the hat and dress are created with simple stitches to give your doll that iconic witchy look. The guide includes everything from crocheting the head, body, and limbs to adding the final touches like the hat, bow, and embroidered face.
You’ll begin by crocheting the head and body in rounds, working through increases and decreases to shape the doll. The dress is crocheted separately and features a cute little bow for added detail. The witch’s hat, complete with a band and buckle, adds the final touch to your creation. Each step is clearly explained, ensuring that even those new to crochet can follow along with ease.
Detailed Crochet Pattern for a Crochet Witch Doll
Crocheting a mini witch doll is one of those projects that blend fun, creativity, and that magical touch only handmade crafts can offer. Perfect for those who love themed decorations, collectibles, or unique gifts, this handmade little witch is sure to win hearts — whether for Halloween, seasonal altars, or as part of an enchanted collection.
Whether you’re an experienced crocheter or an excited beginner, this pattern is perfect for turning yarn into pure fantasy!
Crochet Witch Doll – Materials Needed:
- Yarn:
- Skin Color (Beige or Pink): 1 skein of worsted weight yarn.
- Hair (Brown or Black): 1 skein of worsted weight yarn.
- Dress and Hat (Black): 1 skein of worsted weight yarn.
- Hat Band and Bow (Purple): 1 skein of worsted weight yarn.
- Buckle (Grey or Silver): Small amount of worsted weight yarn.
- Crochet Hook: Size G/4.0mm.
- Stitch Marker
- Scissors
- Yarn Needle
- Safety Eyes or black embroidery thread for eyes.
- Embroidery Thread (Black): For mouth and eyelashes.
- Stuffing for the doll.
Crochet Witch Doll. Abbreviations:
- ch – chain
- sl st – slip stitch
- sc – single crochet
- hdc – half double crochet
- dc – double crochet
- inc – increase (2 sc in the same stitch)
- dec – decrease (sc 2 together)
- st(s) – stitch(es)
- R – round/row
Crochet Witch Doll. Head and Body
- Head:
- With skin color yarn, make a magic ring.
- R1: 6 sc in the magic ring. (6 sts)
- R2: Inc in each st around. (12 sts)
- R3: Sc in next st, inc in next st around. (18 sts)
- R4: Sc in next 2 sts, inc in next st around. (24 sts)
- R5-R9: Sc in each st around. (24 sts)
- R10: Sc in next 2 sts, dec in next st around. (18 sts)
- R11: Sc in next st, dec in next st around. (12 sts)
- Insert safety eyes between R7 and R8, about 6 sts apart.
- Stuff the head firmly with fiberfill.
- R12: Dec around. (6 sts)
- Fasten off, leaving a long tail for sewing.
- Body:
- With dress color yarn (black), make a magic ring.
- R1: 6 sc in the magic ring. (6 sts)
- R2: Inc in each st around. (12 sts)
- R3: Sc in next st, inc in next st around. (18 sts)
- R4: Sc in each st around. (18 sts)
- R5: Sc in next 2 sts, inc in next st around. (24 sts)
- R6-R9: Sc in each st around. (24 sts)
- R10: Sc in next 2 sts, dec in next st around. (18 sts)
- R11: Sc in next st, dec in next st around. (12 sts)
- Stuff the body.
- R12: Dec around. (6 sts)
- Fasten off, leaving a long tail for sewing.
- Legs (Make 2):
- With skin color yarn, ch 5.
- R1: Sc in 2nd ch from hook and across. (4 sts)
- R2: Ch 1, turn. Sc in each st across. (4 sts)
- R3-R5: Repeat R2.
- Switch to dress color yarn (black).
- R6: Sc in each st across.
- R7-R10: Sc in each st across.
- Fasten off, leaving a long tail for sewing.
- Arms (Make 2):
- With skin color yarn, ch 6.
- R1: Sc in 2nd ch from hook and across. (5 sts)
- R2: Ch 1, turn. Sc in each st across. (5 sts)
- R3-R6: Repeat R2.
- Fasten off, leaving a long tail for sewing.
Hair
- Hair Cap:
- With hair color yarn, make a magic ring.
- R1: 6 sc in the magic ring. (6 sts)
- R2: Inc in each st around. (12 sts)
- R3: Sc in next st, inc in next st around. (18 sts)
- R4: Sc in next 2 sts, inc in next st around. (24 sts)
- R5-R6: Sc in each st around. (24 sts)
- Fasten off, leaving a long tail for sewing.
- Attach the hair cap to the head by sewing around the edges.
- Hair Strands (Optional):
- Cut strands of yarn for the hair and attach them to the hair cap, using a hook to pull through and knotting them to secure.
Crochet Witch Doll Hat
- Hat Brim:
- With black yarn, make a magic ring.
- R1: 6 sc in the magic ring. (6 sts)
- R2: Inc in each st around. (12 sts)
- R3: Sc in next st, inc in next st around. (18 sts)
- R4: Sc in next 2 sts, inc in next st around. (24 sts)
- R5: Sc in next 3 sts, inc in next st around. (30 sts)
- R6: Sc in next 4 sts, inc in next st around. (36 sts)
- R7: Sc in next 5 sts, inc in next st around. (42 sts)
- Fasten off.
- Hat Body:
- With black yarn, attach to the inner edge of the hat brim.
- R1: Sc in each st around. (42 sts)
- R2: Sc in next 5 sts, dec in next st around. (36 sts)
- R3: Sc in next 4 sts, dec in next st around. (30 sts)
- R4: Sc in next 3 sts, dec in next st around. (24 sts)
- R5: Sc in next 2 sts, dec in next st around. (18 sts)
- R6: Sc in next st, dec in next st around. (12 sts)
- R7: Dec around. (6 sts)
- Fasten off, leaving a long tail for sewing.
- Hat Band:
- With purple yarn, ch 40.
- R1: Sc in 2nd ch from hook and across. (39 sts)
- Fasten off, leaving a long tail for sewing.
- Attach the band around the hat, just above the brim.
- Buckle:
- With grey yarn, ch 6.
- R1: Sc in 2nd ch from hook and across. (5 sts)
- R2-R3: Ch 1, turn. Sc in each st across. (5 sts)
- Fasten off, leaving a long tail for sewing.
- Attach the buckle to the center of the hat band.
Dress and Bow
- Dress Skirt:
- With black yarn, ch 30.
- R1: Sc in 2nd ch from hook and across. (29 sts)
- R2-R5: Ch 1, turn. Sc in each st across. (29 sts)
- R6: Sc in next 2 sts, inc in next st around. (38 sts)
- R7: Sc in next 3 sts, inc in next st around. (46 sts)
- Fasten off, leaving a long tail for sewing.
- Bow:
- With purple yarn, ch 10.
- R1: Sc in 2nd ch from hook and across. (9 sts)
- R2-R4: Ch 1, turn. Sc in each st across. (9 sts)
- Fasten off, leaving a long tail for sewing.
- Tie a small piece of yarn around the center to form the bow.
- Attach the bow to the front of the dress.
Assembly
- Sew the head to the body using the long tails left on each part.
- Attach the legs and arms to the body by sewing them securely in place.
- Place the dress over the body and sew it closed at the back.
- Position the witch hat on the head and sew it in place.
- Embroider the face with black thread, adding eyelashes and a small smile.
- Add any final touches like attaching the hat at a slight angle or securing the bow in a specific position.
This crochet pattern, Crochet Witch Doll, will help you create a charming little witch doll, perfect for Halloween or as a fun decorative piece! Making a crochet mini witch doll is more than a craft project — it’s a way to bring little worlds to life, spark imagination, and spread a bit of magic wherever she goes. And the best part: it carries your unique creative touch.
Ready to start creating yours? Crochet Witch Doll, try creating variations with different color palettes (like navy blue and silver, or burgundy and gold), and name your collection of witch dolls! Each one can represent an element, a season, or a feminine archetype.