This Adorable Angry Little Witch Crochet is the perfect project for those who love creating whimsical and charming characters. With her expressive face, cute witch hat, and tiny accessories, this little witch is sure to cast a spell on anyone who sees her. Whether you’re making her for Halloween or as a gift for a friend, this crochet pattern is a fun and engaging project.
As a lifelong crocheter and lover of all things whimsical, I can’t tell you how much I absolutely adored creating this Adorable Angry Little Witch. There’s just something so perfectly charming about a tiny amigurumi character who looks like she’s had one too many spells go wrong or maybe someone took the last candy corn without asking. Her pouty little face? Completely irresistible!
From the moment I started stitching her tiny boots to the final detail of her mini broomstick, I was hooked (pun intended!). I used worsted weight yarn to give her a slightly chunky and cuddly look, and let me tell you—watching her personality come together with every round was such a treat. That furrowed brow, her tiny curled fists at her sides, and that little hat that’s just slightly too big for her head—it all just screams, “I’m mad and I’m magical!”
Create Your Adorable Angry Little Witch Crochet
The Adorable Angry Little Witch crochet doll is not only adorable but also a great way to practice your amigurumi skills. With step-by-step instructions, you’ll be able to create this charming little witch with her distinct personality. Perfect for adding a bit of magic to your crochet collection!
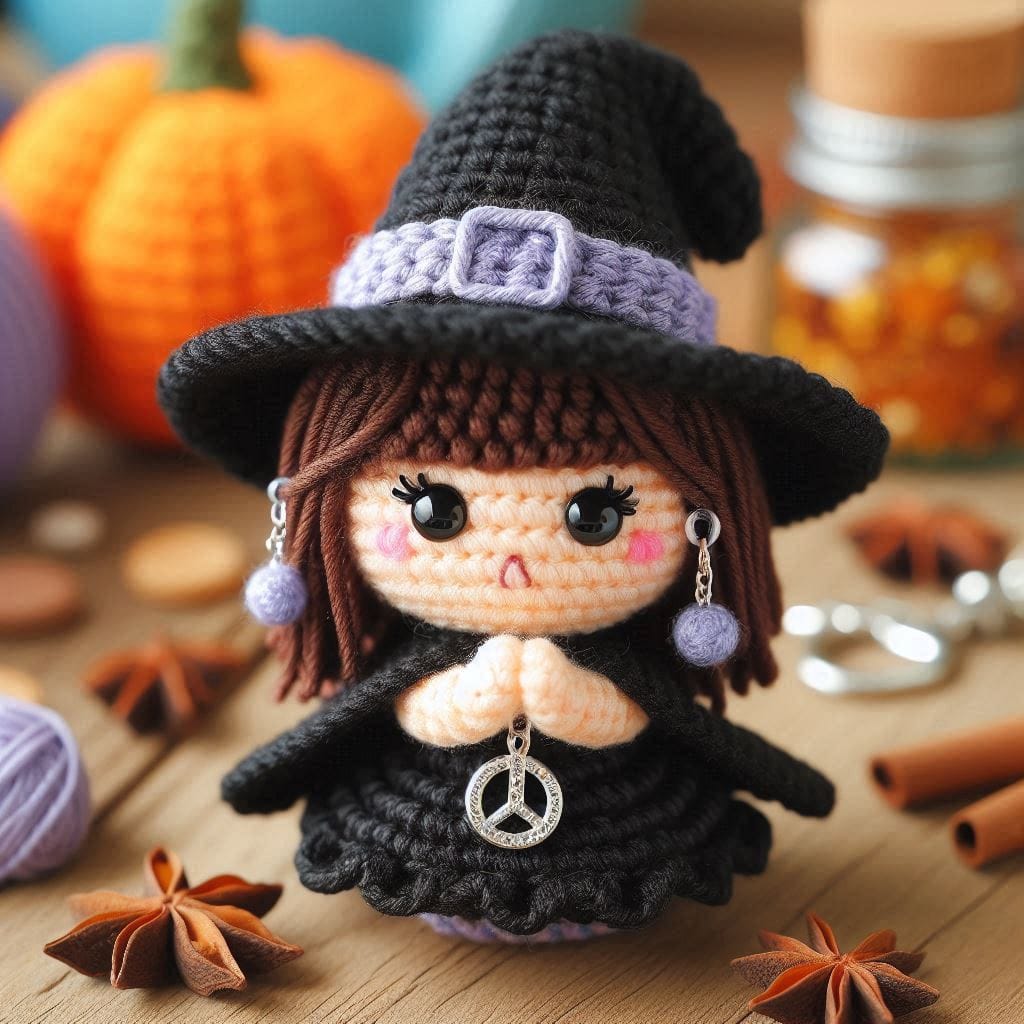
One of my favorite parts of this project was crafting her dress. I went with a deep plum purple and added some little orange accents to give her that classic Halloween vibe. But honestly, you could get creative here—imagine her in midnight blue, deep red, or even green if you’re feeling a little witchy-wild! The dress flares out just enough to give her that “tiny but fierce” attitude, and I added a few ruffles at the hem for extra sass.
Her hat was another fun detail. It’s a classic witchy cone with a twist—literally! The top curls just slightly, which I think gives her even more personality. I added a small patch to the side like she’s been wearing it for a century of adventures (or tantrums!). For her face, I embroidered little eyebrows that slant downward to give her that perfect grumpy expression, and added rosy cheeks for a touch of cuteness underneath all that fury.
And of course, she had to have a broom. I crocheted a tiny one with natural twine for the bristles and a brown yarn handle. It ties the whole piece together, and she looks ready to zoom off and scold anyone who dares cross her path! I also added a mini pumpkin accessory—because no witch, angry or not, is complete without a Halloween-themed sidekick.
In conclusion, theAdorable Angry Little Witch crochet doll is a delightful project that will bring joy to any crafter. Whether you’re an experienced crocheter or just starting out, this pattern is a fun way to explore your creativity.
Materials Needed:
- Yarn (in colors: black, purple, brown, beige, pink)
- Black: for the witch’s hat, dress, and shoes
- Purple: for the hat band and accessories
- Brown: for the hair
- Beige: for the skin
- Pink: for blush details on the cheeks
- Crochet Hook (typically 2.5mm – 3.5mm for amigurumi)
- Polyfill stuffing
- Safety eyes (12mm or size of choice)
- Yarn needle
- Scissors
- Stitch markers (optional)
- Small accessories (like a tiny peace sign pendant)
Abbreviations:
- MR: Magic Ring
- SC: Single Crochet
- INC: Increase (2 SC in one stitch)
- DEC: Decrease (SC two stitches together)
- CH: Chain
- SL ST: Slip Stitch
- RND: Round
Step 1: Head
- Start with Beige Yarn:
- RND 1: MR, 6 SC in the ring. (6 SC)
- RND 2: INC in each stitch around. (12 SC)
- RND 3: SC, INC repeat around. (18 SC)
- RND 4: 2 SC, INC repeat around. (24 SC)
- RND 5-10: SC in each stitch around. (24 SC)
- RND 11: 2 SC, DEC repeat around. (18 SC)
- RND 12: SC, DEC repeat around. (12 SC)
- Stuff the head firmly with polyfill.
- RND 13: DEC around. (6 SC)
- Fasten off and weave in the end.
Step 2: Body
- Start with Black Yarn:
- RND 1: MR, 6 SC in the ring. (6 SC)
- RND 2: INC in each stitch around. (12 SC)
- RND 3: SC, INC repeat around. (18 SC)
- RND 4-8: SC in each stitch around. (18 SC)
- Stuff the body with polyfill.
- RND 9: SC, DEC repeat around. (12 SC)
- RND 10: DEC around. (6 SC)
- Fasten off, leaving a long tail to sew the body to the head.
Step 3: Arms (Make 2)
- Start with Beige Yarn:
- RND 1: MR, 6 SC in the ring. (6 SC)
- RND 2-7: SC in each stitch around. (6 SC)
- Stuff lightly, and fasten off, leaving a long tail to sew the arms to the body.
Step 4: Legs (Make 2)
- Start with Black Yarn:
- RND 1: MR, 6 SC in the ring. (6 SC)
- RND 2: SC in each stitch around. (6 SC)
- Change to beige yarn.
- RND 3-8: SC in each stitch around. (6 SC)
- Stuff lightly, and fasten off, leaving a long tail to sew the legs to the body.
Step 5: Hat
- Start with Black Yarn:
- RND 1: MR, 6 SC in the ring. (6 SC)
- RND 2: INC in each stitch around. (12 SC)
- RND 3: SC, INC repeat around. (18 SC)
- RND 4: 2 SC, INC repeat around. (24 SC)
- RND 5: 3 SC, INC repeat around. (30 SC)
- Continue increasing until you reach the desired diameter.
- Work even SC rounds to form the height of the hat.
- Fasten off, leaving a long tail to attach the hat to the head.
- Add Purple Band:
- CH enough to fit around the base of the hat, SL ST into the first CH to form a ring.
- SC in each stitch around, fasten off, and sew onto the hat.
Step 6: Hair
- Using Brown Yarn:
- Cut strands of yarn to the desired length for hair.
- Attach strands around the head using a latch hook or by simply tying knots.
Step 7: Face Details
- Attach Safety Eyes:
- Position and insert safety eyes between RND 6 and 7 of the head.
- Embroider Details:
- Using black yarn, embroider eyelashes, eyebrows, and a small mouth.
- Add blush on the cheeks with pink yarn or embroidery thread.
Step 8: Assembly
- Sew the Head to the Body:
- Use the long tail left on the body to attach the head securely.
- Attach Arms and Legs:
- Sew the arms and legs to the body using the long tails left on each piece.
- Attach the Hat:
- Position the hat on the head and sew it in place.
- Add Accessories:
- Attach the small peace sign pendant or other tiny accessories to enhance the doll’s personality.
Step 9: Final Touches
- Weave in All Ends:
- Use a yarn needle to weave in any remaining ends for a clean finish.
Adorable Angry Little Witch Crochet. Conclusion
In the end, this Adorable Angry Little Witch Crochet isn’t just a project—it’s a whole mood. She reminds me that it’s okay to be small and fierce, to be cute and cranky, and to own your magic no matter what. She might be a tiny ball of yarn and stuffing, but she’s got a lot of heart (and attitude), and I’m so proud to have her in my handmade family.