Hello, fellow yarn lovers!
If you’ve been looking for a fun, quick, and magical crochet project, let me tell you about one of my absolute favorite makes this season: the Simple and Easy Witch Amigurumi. She’s cute, charming, beginner-friendly, and just the right mix of spooky and sweet. Whether you’re just dipping your toes into amigurumi or need a satisfying project for your weekend, this little witch will cast a spell on your heart.
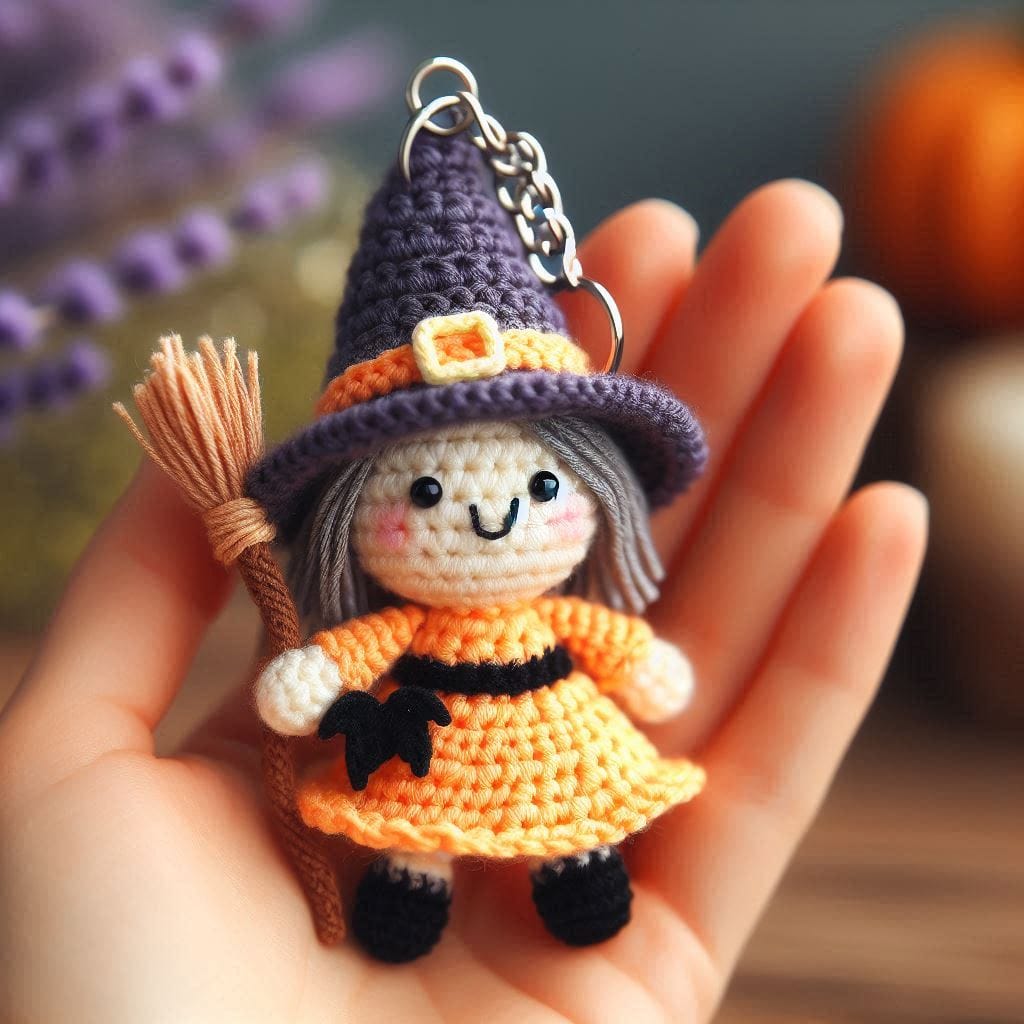
Creating a simple and easy witch amigurumi keychain is a delightful project for both beginners and experienced crocheters. This charming little keychain makes for a perfect Halloween accessory or a fun gift for friends and family who love whimsical crochet items.
How to Crochet a Simple and Easy Witch Amigurumi Keychain
Crocheting a simple and easy witch amigurumi keychain involves just a few basic stitches and some creative flair. In just a few steps, you can bring this adorable witch to life, complete with a pointed hat and a tiny broomstick.
Sometimes, as crocheters, we want to make something adorable without having to commit to a huge, complicated pattern. That’s exactly how this witch came to life! I was in the mood for something festive, a little Halloween flair, but I didn’t want anything too fussy — just a cozy evening project I could enjoy while sipping tea and watching my favorite spooky movie.
This Simple and Easy Witch Amigurumi was my answer. No complicated shaping, no tiny accessories that take hours — just basic stitches, minimal sewing, and maximum cuteness.
Materials:
- Yarn: Light or medium weight yarn in black, green, purple, and a small amount of brown
- Crochet Hook: Size 2.5mm or 3mm
- Polyester stuffing
- Tapestry needle
- Scissors
- Keychain ring
- Stitch marker (optional)
Abbreviations:
- MR: Magic ring
- ch: Chain
- sc: Single crochet
- inc: Increase (2 sc in the same stitch)
- dec: Decrease (single crochet two stitches together)
- sl st: Slip stitch
Pattern Instructions:
Head:
- With green yarn, create a MR, ch 1, and work 6 sc into the ring. Tighten and join with a sl st. (6)
- Round 2: inc in each stitch around. (12)
- Round 3: sc in next stitch, inc; repeat around. (18)
- Round 4: sc in next 2 stitches, inc; repeat around. (24)
- Rounds 5-7: sc in each stitch around. (24)
- Round 8: sc in next 2 stitches, dec; repeat around. (18)
- Round 9: sc in next stitch, dec; repeat around. (12)
- Begin stuffing the head with polyester filling.
- Round 10: dec around. (6)
- Fasten off and weave in the end.
Body:
- With black yarn, create a MR, ch 1, and work 6 sc into the ring. (6)
- Round 2: inc in each stitch around. (12)
- Rounds 3-5: sc in each stitch around. (12)
- Fasten off, leaving a long tail for sewing. Stuff the body lightly.
Hat:
- With purple yarn, create a MR, ch 1, and work 4 sc into the ring. (4)
- Round 2: sc in next stitch, inc; repeat around. (6)
- Round 3: sc in next 2 stitches, inc; repeat around. (8)
- Round 4: sc in next 3 stitches, inc; repeat around. (10)
- Rounds 5-6: sc in each stitch around. (10)
- Fasten off and leave a long tail for sewing.
Broomstick:
- With brown yarn, ch 6.
- Starting in the second ch from hook, sc across. (5)
- Fasten off and leave a tail for sewing.
Assembly:
- Sew the head to the body using the yarn tails.
- Attach the hat on top of the head, slightly tilted if desired.
- Sew the broomstick to the side of the body or hand of the witch.
- Attach the keychain ring to the top of the head.
- Weave in all remaining ends.
Final Touches:
- Embroider a small face onto the witch using black thread or yarn.
- Optionally, add details like a small bow or button on the body.
This little witch is worked up in classic amigurumi style: in continuous rounds from head to toe, mostly using single crochet. It’s a great intro project if you’re new to amigurumi — no complicated shaping, just increases and decreases where needed.
Head & Body:
I started from the top of her head and worked downward in a continuous spiral. The head and body are crocheted as one piece, so there’s no need to sew them together (yay!). I added the safety eyes before closing the head and stuffed as I went. The dress is made as part of the body using color changes — no separate pieces.
Arms & Legs:
These are simple tubes with minimal shaping. I didn’t stuff the arms at all, and just lightly filled the legs. They’re quick to make and super easy to sew onto the sides and base of the body.
Hat:
The witchy hat might be my favorite part. It’s a basic cone shape with a tiny brim, made in black yarn. I stitched it directly onto her head, but you can also leave it removable if you want her to have a dress-up moment. I added a small yellow “buckle” using a scrap of yarn for extra flair.
Face Details:
I embroidered a tiny mouth and gave her a blush using pink yarn — but honestly, her little smile could be spooky, sweet, or even sleepy. That’s the fun part — you can give her any expression you want!
Conclusion
Your simple and easy witch amigurumi keychain is now complete! This little project is quick and enjoyable, making it an ideal gift or addition to your Halloween decorations. Customize your witch with different colors or accessories to make it uniquely yours.
Once you’ve made one witch… you’ll want to make a whole coven! Seriously, the customization options are endless:
- Change the dress color to match different seasons — fall orange, winter blue, spring pastels.
- Add tiny stars or moons to her hat using embroidery or beads.
- Give her a broomstick using a toothpick and a bit of yarn!
- Create mini potions or pumpkins as props.
- Turn her into a keychain or ornament by attaching a small loop on top.
Each little witch takes me about 2-3 hours total, and they’re the perfect size for gifting or decorating a Halloween table or shelf. I even hung one on my rearview mirror, and she keeps me company on car rides.