Create an adorable crochet ladybug tutorial with this easy-to-follow tutorial! This cute amigurumi is perfect for keychains, baby mobiles, or decorative accents.
Creating a Crochet Ladybug Tutorial is one of those projects that instantly brings a sense of joy, both in the making and in the finished piece. As an experienced crocheter, I’ve always been drawn to small, nature-inspired amigurumi, and the ladybug is a perfect example of how something simple can be full of charm and personality. It’s a design that feels playful and lighthearted, yet it still allows you to refine your technique and pay attention to the details that truly make a piece stand out.
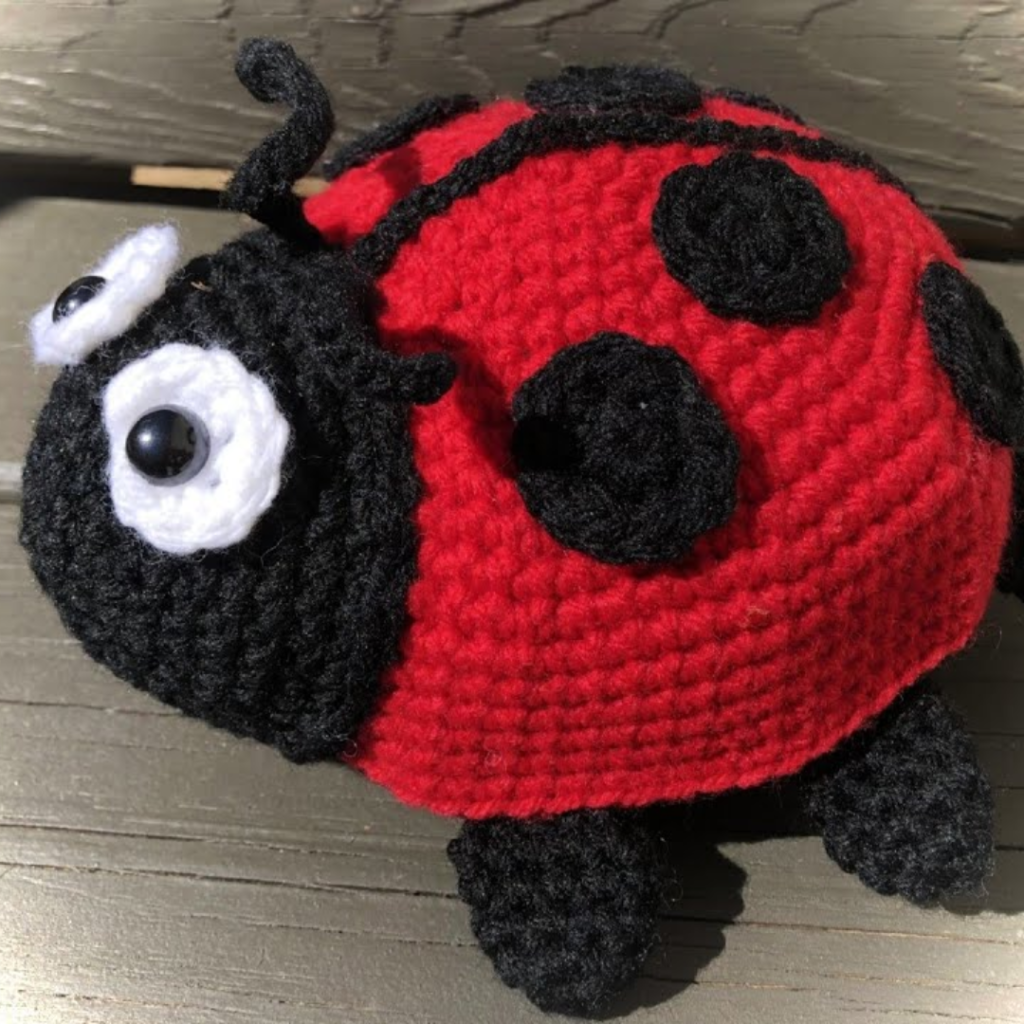
When I begin a crochet ladybug, the first thing I think about is color. That classic combination of bright red and deep black is what gives the ladybug its unmistakable look. I usually choose a smooth cotton yarn because it provides excellent stitch definition and helps keep the shape crisp and well-formed. Since this is a small project, I also prefer using a slightly smaller hook than recommended. This keeps the stitches tight, ensuring that the stuffing stays hidden and the surface looks neat and even.
Crochet Ladybug Tutorial – Easy Amigurumi Pattern
The construction typically starts with the body, which is worked in continuous rounds to create a smooth, rounded shape. This is where I settle into a steady rhythm, focusing on even tension and careful stitch placement. Over time, this becomes almost instinctive, but I still take care to count my stitches and check the shape as it develops. The body should be nicely domed, not too flat and not overly firm. I like to add stuffing gradually, shaping it with my fingers as I go to achieve that soft, rounded form that gives the ladybug its characteristic look.
One of the most enjoyable aspects of this project is the colorwork. Dividing the red shell into sections and incorporating the black details requires a bit of attention, but it’s incredibly satisfying to see the pattern emerge. Clean color changes are important here, and I always take a moment to ensure the transitions are neat. Sometimes I’ll carry the yarn carefully or fasten off and rejoin, depending on the design. These small decisions help keep the final piece looking polished.
This crochet ladybug tutorial will guide you through making a small, round ladybug with signature black spots and tiny antennae. A fun project for all skill levels!
Now that you’ve completed your crochet ladybug tutorial, you have a charming handmade piece! Make a set in different sizes for gifts or home decorations. Happy crocheting!
Crochet Ladybug Tutorial – Free Amigurumi Pattern
The black spots are what truly bring the ladybug to life. They can be crocheted directly into the piece, embroidered, or added as small appliqués. Personally, I enjoy crocheting or embroidering them afterward because it gives me more control over their placement. I like to arrange them in a way that feels balanced but still natural, as real ladybugs aren’t perfectly symmetrical. This step is where you can add a bit of personality, making each piece slightly unique.
The head is usually worked separately in black yarn and then attached to the body. It’s a smaller, rounded shape, and I take care to keep it proportionate. The eyes are simple but expressive, often made with small safety eyes or embroidered stitches. Placement is key here. Even a slight adjustment can change the entire expression, so I take my time to position them just right. A tiny stitched smile can add a touch of charm, but I often keep it minimal to maintain that classic amigurumi look.
The underside of the ladybug is another detail that I enjoy working on. It’s usually flatter and helps stabilize the piece, allowing it to sit nicely on a surface. This part might not be as visible, but it contributes to the overall structure and finish. I always make sure it’s evenly worked and securely attached, as it supports the entire piece.
As I move into the final stages, I slow down and focus on assembling everything with care. Attaching the head to the body requires a steady hand and attention to alignment. I often pin the pieces in place first to ensure they sit correctly before stitching them together. This extra step helps avoid any imbalance and ensures the finished ladybug looks cohesive.
Finishing touches are where the piece truly comes together. I weave in all the ends carefully, making sure nothing is visible or loose. Sometimes I’ll gently shape the ladybug with my hands, adjusting the stuffing slightly to perfect the form. These small refinements might seem minor, but they make a noticeable difference in the final result.
Materials:
- Red and black worsted weight yarn
- 3.0 mm crochet hook
- Tapestry needle
- Scissors
- Fiberfill stuffing
- Small safety eyes (or black yarn for embroidery)
Abbreviations (US Terms):
- MR – Magic Ring
- SC – Single Crochet
- INC – Increase (2 SC in the same stitch)
- DEC – Decrease (SC2TOG)
- SL ST – Slip Stitch
- FO – Fasten Off
Pattern:
Ladybug Body (Red):
- MR, 6 SC in ring (6)
- INC in each stitch (12)
- (SC, INC) around (18)
- (2 SC, INC) around (24)
- (3 SC, INC) around (30)
6-10. SC around (30) - (3 SC, DEC) around (24)
- (2 SC, DEC) around (18), stuff the body
- (SC, DEC) around (12)
- DEC around (6), FO and close.
Ladybug Head (Black):
- MR, 6 SC in ring (6)
- INC in each stitch (12)
- (SC, INC) around (18)
4-5. SC around (18) - (SC, DEC) around (12), stuff lightly
- DEC around (6), FO and close. Sew to the body.
Ladybug Spots (Black, Make 5-6):
- MR, 6 SC in ring, SL ST to close. FO, leaving a tail for sewing. Attach to the body.
Antennae (Black, Make 2):
- CH 6, SC back along the chain. FO and sew onto the head.
Assembly:
- Sew the spots onto the red body.
- Attach the head to the body.
- Add safety eyes or embroider small black eyes.
- If making a keychain, attach a loop at the top.
In the end, creating a Crochet Ladybug Tutorial is about more than just the finished piece. It’s about the process—the steady flow of stitches, the thoughtful choices along the way, and the quiet joy of seeing something take shape in your hands. And when you finally finish, you’re left with a small, charming creation that feels full of life, a perfect example of how much beauty can come from something so simple.
Note: Here is a pattern suggestion for you to create your own pattern. The end result may vary.