Carry a touch of cuteness everywhere with this crochet dog pug keychain! This pattern is perfect for pug lovers and makes a great handmade gift.
Creating a Crochet Dog Pug Keychain is one of those projects that instantly makes me smile every time I pick up my crochet hook. As an experienced crocheter, I’ve always believed that the smallest amigurumi projects often have the biggest personalities, and a tiny pug keychain proves exactly that. Pugs have such distinctive features—their wrinkled faces, round eyes, floppy ears, and compact little bodies—that recreating them in crochet feels both challenging and incredibly rewarding. Every stitch contributes to capturing the lovable expression that makes this breed so popular.
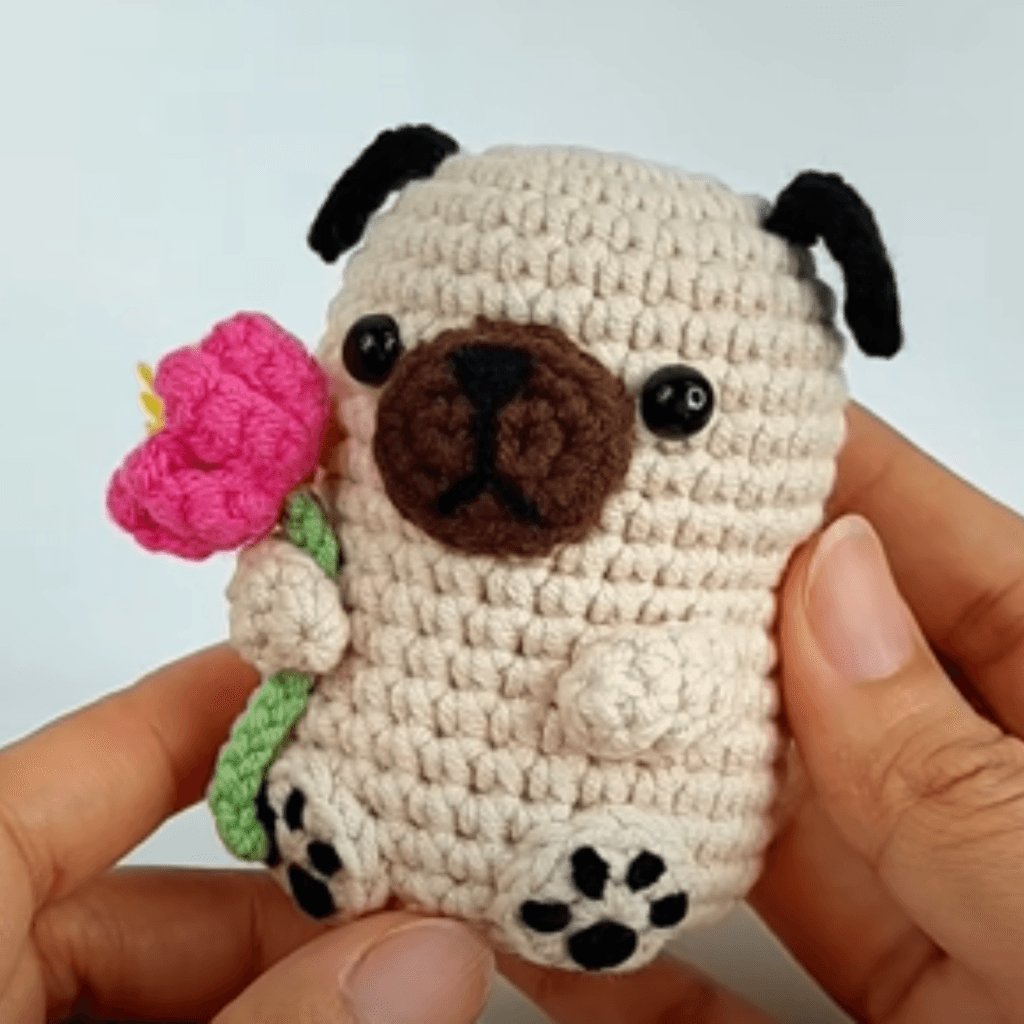
Whenever I start a crochet pug, the very first thing I think about is choosing the right yarn. Since the project is quite small, every detail becomes more noticeable, so I prefer using high-quality cotton yarn. Cotton gives beautiful stitch definition, allowing the facial shaping and color changes to stand out clearly. For the main body, I usually choose a warm beige or fawn color, paired with a rich black for the muzzle, ears, and tiny facial details. These simple color choices immediately create the recognizable appearance of a pug without requiring overly complicated techniques.
Hook selection is equally important. For amigurumi keychains, I almost always use a hook one or two sizes smaller than what the yarn label recommends. Tight stitches are essential because they keep the stuffing securely inside while giving the project a smooth, professional finish. A firm fabric also helps the little dog maintain its shape after being attached to keys or a backpack where it will be handled every day. One thing I’ve learned over the years is that consistency in tension is far more important than speed. Slow, even stitches always produce a cleaner and more durable result.
How to Make a Crochet Dog Pug Keychain
I generally begin with the head because it is undoubtedly the most important part of the entire project. The head is what gives the pug its unmistakable personality. Working in continuous rounds, I carefully shape the sphere while paying close attention to my increases. As the piece grows, I gradually add small amounts of stuffing instead of filling it all at once. This allows me to gently mold the head with my fingers, eliminating lumps and creating a smooth surface. Taking extra time during this stage always pays off because a perfectly rounded head creates the ideal canvas for all the facial features that come later.
The muzzle is what truly transforms an ordinary dog into a recognizable pug. I enjoy crocheting this piece separately because it allows me to control its shape more precisely. It needs to be slightly rounded but still compact, creating the illusion of the pug’s adorable flat face. Once completed, I carefully position it on the head before sewing it permanently. I often pin it in place first, step back, and look at the proportions from different angles. Small adjustments during assembly can completely change the final expression, so patience is essential.
Crafting a crochet dog pug keychain is simple and fun. With just a few materials and basic crochet skills, you can create this adorable accessory. This crochet dog pug keychain is an irresistible project that’s quick to make and highly customizable. Add it to your bag or gift it to a fellow pug lover!
Crochet Dog Pug Keychain Pattern
The eyes are another feature that deserves special attention. Pugs are known for their large, expressive eyes, and I like to recreate that look using appropriately sized safety eyes. Their placement determines whether the finished dog appears playful, curious, or sweet. Sometimes moving an eye by just a single stitch can dramatically improve the expression. After making many amigurumi animals over the years, I’ve learned never to rush this part of the process.
The ears may be small, but they add tremendous character. I crochet each ear separately using black yarn and shape them so they naturally fold forward. Positioning the ears correctly helps frame the face and reinforces the breed’s recognizable silhouette. Once they’re attached, the pug starts to look complete, and it’s always one of my favorite moments during the project.
The body is relatively simple compared to the head, but maintaining proper proportions remains important. I prefer a compact, rounded body that complements the oversized head, giving the keychain that classic amigurumi style. The arms and legs are intentionally small, creating a charming cartoon-like appearance while keeping the project lightweight enough to function comfortably as a keychain.
Materials:
- Yarn: Light brown, dark brown, and black (DK or worsted weight)
- Hook: 2.5 mm crochet hook
- Stuffing: Polyester fiberfill
- Safety eyes: 6 mm
- Keychain ring with clip
- Yarn needle
- Embroidery thread: Black for nose and mouth
- Scissors
Abbreviations:
- MR: Magic ring
- sc: Single crochet
- inc: Increase (2 sc in the same stitch)
- dec: Decrease (sc2tog)
- sl st: Slip stitch
Instructions:
Head (Light Brown):
- Round 1: MR, 6 sc into the ring. (6)
- Round 2: Inc in each stitch around. (12)
- Round 3: [1 sc, inc] repeat around. (18)
- Round 4: [2 sc, inc] repeat around. (24)
- Rounds 5-8: Sc in each stitch around. (24)
- Round 9: [2 sc, dec] repeat around. (18)
- Insert safety eyes between Rounds 6-7, 5 stitches apart.
- Round 10: [1 sc, dec] repeat around. (12)
- Begin stuffing.
- Round 11: Dec around. (6)
- Fasten off and close the opening.
Ears (Dark Brown, Make 2):
- Round 1: MR, 6 sc into the ring. (6)
- Round 2: Sc in each stitch around. (6)
- Fasten off, leaving a long tail for sewing.
- Fold in half and sew each ear onto the head.
Muzzle (Light Brown):
- Round 1: MR, 6 sc into the ring. (6)
- Round 2: Inc in each stitch around. (12)
- Round 3: Sc in each stitch around. (12)
- Fasten off and sew onto the lower center of the face.
- Use black embroidery thread to stitch the nose and mouth.
Body (Light Brown):
- Round 1: MR, 6 sc into the ring. (6)
- Round 2: Inc in each stitch around. (12)
- Round 3: [1 sc, inc] repeat around. (18)
- Rounds 4-6: Sc in each stitch around. (18)
- Round 7: [1 sc, dec] repeat around. (12)
- Round 8: Dec around. (6)
- Stuff the body firmly, fasten off, and close.
Arms and Legs (Dark Brown, Make 4):
- Round 1: MR, 6 sc into the ring. (6)
- Round 2: Sc in each stitch around. (6)
- Fasten off and sew two arms to the sides and two legs to the bottom of the body.
Tail (Dark Brown):
- Round 1: MR, 4 sc into the ring. (4)
- Round 2: Sc in each stitch around. (4)
- Fasten off and sew to the back of the body.
Assembly:
- Attach the head to the body securely.
- Sew the keychain ring to the top of the head.
- Make any final adjustments to the facial features.
In the end, creating a Crochet Dog Pug Keychain is about much more than making a practical accessory. It is about celebrating one of the most beloved dog breeds through the art of crochet, paying attention to every little feature that makes a pug so recognizable and adorable. From the rounded head and expressive eyes to the curled tail and tiny floppy ears, every stitch contributes to a finished piece that is full of charm, personality, and the unmistakable warmth of handmade craftsmanship.